DIY Industrial Shelving
- Ray and Karla Graves
- Jul 17, 2017
- 4 min read

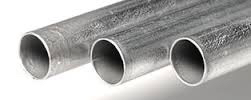
ELECTRICAL CONDUIT- The solution to all of our industrial pipe problems for the rest of our lives.
.
We have fallen in love.
Head over heels.
Never going back.
Found in your home improvement store, this style of pipe is not only super cost effective (we found ours at $2.68/ for a whole TEN feet) but is versatile enough to be used for a variety of projects (think shelving, indoor curtain rods and outdoor curtain rods to name a few)
You can find it in our bedroom, in our office, in our living room and even in our outside patio. We have found so many uses for this super inexpensive material and we can't wait to share everything we've used this material to do, starting with this DIY industrial shelving unit-

SHOPPING LIST:
6 - 1/2" EMT Conduit (these will be your pipes. Each conduit should measure 10' long)
3 - 1/2" EMT Inside Corner Pull Elbow
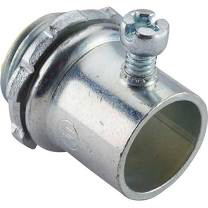
9 - 1/2" EMT Set Screw Connectors
42 - Stainless Steel Clamps, size 1/4"-5/8". (we found ours sold in packs of ten at our home improvement store)
3 - 1/2" wall flange
7- 1x12 utility shelving boards (@ 8 feet long)
Zip tie drywall anchor screws
White paint
Paintbrush
Paint Rags
COST: aprox. $148.00


TOOLS:
Drill
Screwdriver
5/8" Spade Drill Bit
9" Drill Bit (for pilot hole)
Cut off Tool or Hack Saw
Safety Glasses
Tape Measurer
Level
Sandpaper
GENERAL INSTRUCTIONS:
Please read through the entire plan before beginning this project. Take all necessary precautions to build safely and smartly. Wear safety glasses and work on a clean level surface, free of imperfections or debris. Always use straight boards. Check for square after each step. Always pre-drill holes before attaching with screws.
Work safely, enjoy, and ask for assistance if you need it. Good luck!
DIMENSIONS:
Finished shelving unit will measure 8' L x 8' W x 14" D
STEP 1:
Take your first shelving board and starting at the corners of the board, mark your drill hole at least 1" from any edge using a pencil. (This is where pipes will go through)
Mark where all 6 pipe holes will go on one board. So-
(1) on front right corner
(1) on right back corner
(1) on front center of the board
(1) on back center of board
(1) on left front corner
(1) on left back corner.
STEP 2 INSTRUCTIONS:
Stack all remaining boards underneath the board you just marked.

Make sure all corners of stacked boards align & take your 9" drill bit to drill your pilot holes through the stack of boards-

(this will ensure your pipe goes straight through all the boards and the placement of each pipe through each hole is the same.)
STEP 3 INSTRUCTIONS:
Using your 5/8" Spade Bit, drill pipe holes following the pilot hole. This can either be done through the entire stack of boards or individually each board.
STEP 4 INSTRUCTIONS:
Using a natural bristle brush, whitewash all of your boards using 1 part white latex paint and four parts water. Have a rag handy to clean up any drips as whitewash tends to drip more than paint and allow boards to fully dry prior to putting shelving together.
STEP 5 INSTRUCTIONS:
Using your cut off tool, cut all of your pipes to 8 feet.

When you are finished cutting, you will have 6 remaining pieces of pipe.
Take 3 of 6 the remaining pieces of pipe and cut them to 12" (these will be the pipes used at top of shelving that will attach shelving to the wall)
STEP 6 INSTRUCTIONS: Putting Shelving Together
Once the boards dry, take all of your materials into the room shelving will be installed in.
Do not pre-build shelving to then transfer to another room. Once shelving is built, it will not fit through doors and will not be able to be moved unless fully taken apart.
Lay all pipes vertically across the floor & starting from the bottom, attach the Set Screw Connectors
to the bottom of all 6 pipes-
(these will be the feet of the shelves and finished feet on shelving will look like this):

STEP 7 INSTRUCTIONS:
Starting from feet of shelving, measure 12" up and mark where first sets of stainless steel clamps-

will go.
(stainless steel clamps will be the hardware that supports & holds each board in place):

Fully tighten stainless steel clamp on each of the pipes using a screwdriver-

& slide all the pipes through the first wooden board

Repeat process with each board, stopping every 13" to place another set of stainless steel clamps, making sure each clamp is fully tightened.

STEP 8 INSTRUCTIONS:
Once all wooden boards have been slid in position-

Take the 3 Inside Corner Pull Elbows:

& attach them to the top of the front three 8' pipes.

STEP 9 INSTRUCTIONS:
Attach the 3 remaining Set Screw Connectors-

to remaining 12" pipes-

STEP 9 INSTRUCTIONS:
Take your 3 wall flanges:

& attach them unto the Set Screw Connectors that you just twisted unto 12" pipes.
STEP 10 INSTRUCTIONS:
After all boards have been set in position and stainless steel clamps checked for tightness, Shelving unit will be ready to be attached to wall.
Grab a couple of people to help you lift it up and hold it in place while you make sure it is level and spaced appropriately away from the wall.
Using the zip tie dry wall anchors, attach the wall flanges to the wall. Be sure to attach all four screw to each flange.

And after each flange is secured to wall using the zip tie dry wall anchors, YOU ARE DONE!-

Congratulations on your new industrial shelving unit!


Comments